
Custom patches sit everywhere in modern fashion and gear. Streetwear labels place them on caps and jackets. Outdoor brands stitch them on backpacks. Tactical teams fix them on uniforms. Many small Australian brands now use PVC patches and 3D silicone patches because they last longer and show strong detail.
These patches hold colour through sun, rain, and dust. The raised structure adds a bold texture that stands out on clothing and equipment. The three dimensional design keeps logos clear and easy to read.
The production process differs from traditional embroidered patches. Thread does not build the design. Makers shape the patch through moulding, layering, and heat curing. This technique forms the foundation of rubber patch manufacturing.
Below is the full step by step workflow used in professional patch factories.
1. Design Concept and Artwork Preparation
Every patch starts with artwork. Brands send their logo, badge design, or symbol to the patch maker. Designers prepare the file so it works for mould production.
The artwork converts into a vector format. This format keeps lines clean and sharp. Machines read the file without losing detail.
Designers then plan the 3D layers. Some areas sit higher while others sit lower. This difference creates the raised rubber look seen in many PVC Patches.
Each colour also receives its own section. This helps during the filling stage later in the process.
Key Design Considerations
A few technical choices shape the final result.
Minimum line thickness: Lines must stay thick enough for rubber moulding.
Number of colours: Each colour becomes a separate fill during production.
Height variations: Higher layers create the 3D texture found in 3D Silicone Patches.
Edge style: Brands choose the border finish such as clean cut edges, stitched edges, or laser cut shapes.
2. Digital Rendering and 3D Mockup Creation
Design teams build a 3D digital mockup of the patch. This preview shows how the layers and colours appear once moulded.
The rendering adjusts several details:
- Depth of raised areas
- Shadow and layer height
- Colour placement
Pantone colour references help match the brand colours with strong accuracy.
Client Approval Stage
The brand reviews the preview carefully.
Teams check:
- Patch size
- Shape and outline
- Colour balance
- Placement of raised elements
Once approved, the design moves into mould production. This step keeps PVC patches and 3D silicone patches consistent with the brand identity.
3. Custom Mould Manufacturing
The mould works as the main tool in rubber patch manufacturing.
Factories engrave the mould using CNC machines or laser engraving. This machine cuts the design into metal with precise depth.
Manufacturers usually create moulds from:
- Aluminium
- Hardened steel
These materials hold shape during repeated heating cycles.
4. Material Preparation (PVC or Silicone)
Patch makers usually work with two rubber materials.
PVC
PVC stands for polyvinyl chloride. It feels firm yet flexible.
Brands often use PVC Patches for:
- Tactical uniforms
- Outdoor gear
- Motorcycle clubs
- Workwear
The material resists water, dirt, and rough use.
Silicone
Silicone feels softer and smoother. Many fashion labels prefer 3D silicone patches for premium apparel.
Silicone works well on:
- Streetwear
- Caps
- Sportswear
- Outdoor lifestyle brands
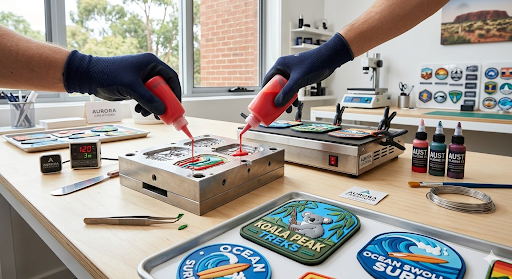
5. Layer by Layer Injection Process
Production workers begin filling the mould with liquid material.
The process usually follows this order:
- Base colour enters the mould first
- The material spreads across the lowest level
- Other colours follow in separate sections
6. Heating and Curing
Filled moulds move into heating chambers. The heat activates a curing reaction. Liquid rubber transforms into solid flexible material.
Both PVC patches and 3D silicone patches gain their durability during this stage.
7. Backing Attachment
Brands choose backing based on how they plan to use the patch.Common options include:
- Hook and loop backing: Used for tactical gear and uniforms.
- Sew on backing: Perfect for jackets, backpacks, and hats.
- Iron on adhesive: Used for fashion garments and merch.
- Peel and stick adhesive: Good for promotional items or temporary use.
8. Demoulding and Edge Trimming
Once curing finishes, workers remove the patches from the mould. Each piece now holds the full 3D rubber design.
Machines trim excess material around the patch edges. Factories often use laser cutting or die cutting to achieve a smooth outline.
9. Surface Finishing and Detailing
Manufacturers add finishing touches to improve durability and style.
Common finishes include:
- Matte surfaces
- Glossy surfaces
- Textured rubber surfaces
- Anti dust coatings
- Anti scratch protection
These coatings help patches stay clean and vibrant during everyday wear.
10. Quality Inspection and Testing
Factories inspect each batch before shipping.
Quality checks include:
- Colour accuracy
- Patch dimensions
- Backing adhesion
- Flexibility of the rubber
This stage ensures the patches match the approved design.
Create 3D Silicone and PVC Patches With Patch Maker Australia
The production of PVC patches and 3D silicone patches follows a precise system. Designers prepare artwork. Engineers build metal moulds. Technicians fill layers of liquid rubber. Heat cures the material into a strong flexible badge.
This process gives patches a bold raised appearance that embroidery cannot match.
The strength of rubber patch manufacturing sits in the combination of engineering and creative design. Brands gain durable logos that survive rain, sun, dust, and daily wear.
For Australian startups and small clothing brands, rubber patches offer a practical way to build brand identity on jackets, caps, uniforms, and outdoor gear. A simple patch often becomes the detail that customers remember.