
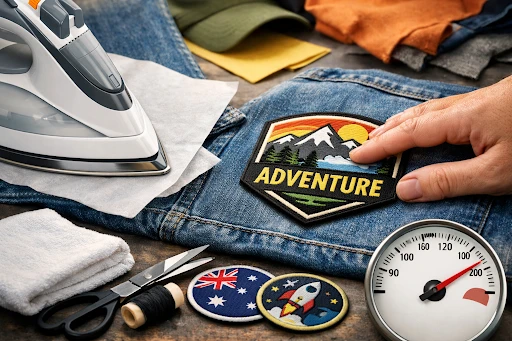
A custom iron on patch is one of the fastest ways to personalise clothing, workwear, bags, and accessories without a sewing kit or a professional tailor. The application process takes under five minutes and delivers a bond that holds through regular washing, daily wear, and the full range of Australian climate conditions when done correctly.
Getting a permanent result from an iron on custom patch comes down to three things: the right tools, the right temperature, and the right technique. Skip any one of those three and the patch lifts, shifts, or peels before the season is out. Follow each step properly and your custom iron on patch stays exactly where you put it.
Tools for Patch Application
Preparing the right setup before you start saves you from the most common application mistakes. You do not need professional equipment to get a clean, permanent bond at home.
- Household Iron: A standard domestic iron works well for most iron on patch custom applications. The key requirement is consistent, controllable heat output with a flat sole plate that sits evenly across the patch surface.
- Pressing Cloth or Parchment Paper: This is non-negotiable. Placing a thin cotton pressing cloth or a sheet of parchment paper between the iron and the patch surface protects the embroidery thread from direct heat contact and distributes the heat evenly across the full patch area.
- Heat-Resistant Surface: A firm, flat, heat-resistant ironing surface gives the patch a stable base to bond against. A standard ironing board works. A folded towel on a hard table also works well, particularly for smaller items like hats and bags where an ironing board surface is awkward to use.
- High-Melt-Point Adhesive Backing: Australian summer temperatures regularly exceed 35 to 40 degrees Celsius, and cars, outdoor storage spaces, and sun-exposed surfaces push ambient temperatures even higher.
Choose the Right Patch Material and Backing
Your patch material and backing type work together to determine how much heat your patch can safely take and how permanently it bonds to your specific garment fabric.
Patch Material
- Twill (Industry Standard, Most Reliable): A firm, tightly woven fabric that handles iron-on heat with ease and maintains structure under pressure. Best suited for workwear, casualwear, uniforms, and merchandise across a wide range of garments.
- Felt (Soft, Aesthetic-Focused Option): Thicker and softer than twill, with a more textured, cushioned feel. Ideal for bags, jackets, and casualwear, where visual softness and style matter more than durability.
How to Apply Patches to Heat-Sensitive Fabrics
Australia has one of the highest concentrations of synthetic activewear and performance fabric use in the world. Moisture-wicking polyester, nylon, spandex blends, and compression fabrics are everyday garments for a large portion of the Australian population, and these materials need a different approach from standard cotton and canvas application.
The Core Problem
Synthetic fabrics have lower melting points than natural fibres. The standard iron on temperature range of 160 to 180 degrees Celsius that bonds perfectly to cotton can distort, shine, or partially melt nylon and moisture-wicking polyester. The damage is permanent and visible.
The Solution: Lower Temperature, Longer Press Time
- Set your iron temperature to 130–150°C when working with nylon and lightweight synthetic fabrics.
- Lower heat requires a longer press time of 45–60 seconds instead of the standard 30–45 seconds.
- The extended, lower-temperature application allows the adhesive to fully activate without risking fabric distortion.
- Always use a pressing cloth barrier between the iron and the patch.
- Direct heat contact can cause permanent surface sheen damage, especially on moisture-wicking or synthetic fabrics.
Test First
Before applying any iron on custom patch to a synthetic garment, press your iron at your chosen temperature setting against an inconspicuous area of the fabric, such as an inside hem or seam allowance, for 10 seconds through the pressing cloth.
Lift and check for any distortion, shine, or texture change. If the fabric is unaffected, proceed with the application. If any change is visible, lower the temperature further or switch to sew-on backing.
Common Iron-On Patch Failures and How to Prevent Them
Most iron on patch custom failures are preventable. Understanding why patches lift, peel, or shift tells you exactly what went wrong and how to fix it.
| Failure Type | Cause | Prevention / Fix |
| Insufficient Pressure | Adhesive doesn’t penetrate fabric fibres; sits on surface | Press firmly and evenly using full body weight through the iron handle. Avoid light resting on the pressing cloth. |
| Uneven Heat Distribution | Iron sole plate uneven; some areas over-bond, others under-bond | Overlap press positions slightly to cover the full patch area evenly. Consider a newer iron if sole plate is worn. |
| Steam Contamination | Moisture interferes with adhesive activation | Use fully dry iron settings. Let residual moisture evaporate for 60 seconds before pressing. |
| Washing Too Soon | Adhesive has not fully cured (needs up to 24 hours) | Wait 24 hours before washing or exposing patch to moisture. |
| Skipping the Cool-Down Period | Handling patch while adhesive is still warm weakens bond | Allow the patch and garment to cool completely before touching, folding, or wearing. |
FAQs
Can I iron a patch onto a leather jacket?
Leather is highly sensitive to sustained direct heat. Iron on application at standard patch temperatures causes heat damage to leather surfaces, including surface cracking, colour change, and permanent texture alteration.
Will the patch stay on after a cold wash?
Yes, provided the application was done correctly with sufficient heat, firm pressure, and a full 24-hour curing period before the first wash. Always turn the garment inside out before machine washing to reduce mechanical friction on the patch edges.
How long should I hold the iron for?
Apply firm, straight-down pressure for 30 to 45 seconds on standard cotton and canvas fabrics. For synthetic and heat-sensitive fabrics, extend to 45 to 60 seconds at a reduced temperature setting.
Does Custom Patches Australia provide different backing options?
Yes. Custom Patches Australia offers heat-seal iron on backing, sew-on backing, velcro backing for modular and interchangeable applications, and magnetic backing for display and non-fabric uses.
Get Perfect Results with Custom Patches Australia
Your logo, your design, and your brand deserve a patch that looks sharp and stays put through every Australian season. Upload your artwork to Custom Patches Australia today for a custom quote, free digital mockup, and local support from a team that understands Australian quality standards, Australian climate conditions, and exactly what it takes to produce a premium embroidered patch that performs as well as it looks.