Personalisation has exploded in popularity across all aspects of fashion and done so ALL OVER THE WORLD (including Australia’s roads, Melbournian alleyways, and Queensland beaches). For those who would want to know how to make embroidered patches, read this article because you are on the right track!
Using embroidered patches in creating designs for clothing, one could definitely come up with different uses for his or her old clothes with the help of innovative designs. However, you might find making an embroidered patch challenging at first.
But it will not be that hard at all once you have learned how to make embroidered patches from scratch. You will surely enjoy it. You can even have an embroidered patch that would suit your taste in terms of colour and texture.
Gathering the Right Materials for Your Craft
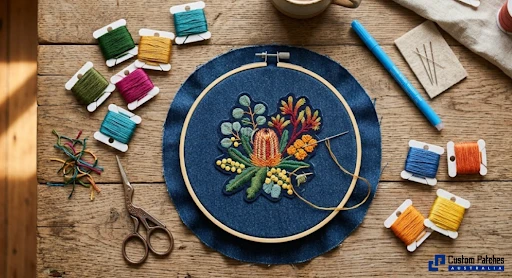
Before embarking on the journey of creating beautiful patches, it is necessary to get prepared, having all necessary materials at hand. First and foremost, the basis of any patch is fabric. It should be chosen properly so that it will not pucker due to being pulled under the tight thread.
The best option would be to use heavyweight cotton twill, denim, or felt fabric. All these are perfect for beginner patchmakers. In fact, felt is the safest choice for absolute beginners, as there is no fraying at the edges. Apart from the base fabric, one needs to purchase an embroidery hoop. Loose fabric prevents neat stitches.
Therefore, it is necessary to ensure that the material does not move while embroidering. Moreover, embroidery floss should be high quality and not prone to breaking. Cheap floss is likely to either break or fade while doing the laundry. Finally, one needs to have embroidery scissors, needles of different sizes, and water-soluble pens to draw your pattern on the fabric.
Designing and Transferring Your Vision
This is the time when you should allow your creativity to blossom without having any restraints whatsoever. You can go as far as deciding to make the patch with some funny native Australian animals, floral patterns, and phrases.
Typography is one of the most popular fashion design trends today, as beginning designers want to know how to make embroidered letter patches so that they can have custom-made designs using their name, initials, or any other special phrase.
When creating embroidered letters, it is best to choose a large, bold print that will be easy to cover with your stitches. After you have drawn your original design out on paper or downloaded one from your computer, the next step is to transfer it onto your fabric.
If the colour of the fabric you are using is light, then it will be rather easy to transfer the design. All you need to do is tape it on the window where there is plenty of sunlight, put the fabric over the pattern, and trace the outlines with the water-soluble pen. If your fabric colour is dark, then a dressmaker’s carbon paper is perfect for this task.
The Meditative Art of Hand Stitching
Hand embroidery is definitely what you should try if you enjoy spending a lot of time on embroidery, sipping tea in the process. How to make embroidered patches by hand means learning just a few basic stitches.
Among these, the satin stitch should be the one that comes to mind immediately. This stitch is based on laying long and straight stitches very densely so that you cover a whole area with a smooth and shiny layer of threads.
It is used for filling most of your design. To embroider the outlines and small details, the backstitch or split stitch will do wonders for you. How to make embroidery patches by hand may require some patience because it is time-consuming.
However, hand-stitched patches are truly unique due to their texture and almost three-dimensional look. You can adjust everything to your taste as you want to control both the tension and colour mixing.
Speeding Up the Process with Technology
For those in a bit of a hurry or who just like the polished look of machine stitching, it may be that you are interested in learning how to make embroidered patches with sewing machine.
This does not mean that you need an expensive embroidery machine worth thousands of dollars to achieve good results. A regular sewing machine can help as well as long as you are willing to set it up for free-motion embroidery.
For this purpose, you should drop the feed dogs of your sewing machine. Those are the metal teeth located under the presser foot that move your fabric forward. By doing so, you become the one guiding the process.
In addition, you need a darning foot. Your hooped fabric is put under the needle, and you start drawing with the thread, moving the hoop by hand as the needle makes its up and down movements.
Securing the Edges for Longevity
Whichever method you choose when creating your patchwork masterpiece, whether hand-sewing or sewing machine sewing, you will end up with a piece of fabric that has all your hard work on it. An important next lesson in the art of patchwork creation is learning how to make patches to complete the edges.
This is necessary for two reasons: firstly, because without an edge, all of your hard work will come apart as soon as you begin using your patch, and secondly, because an edging adds to the visual appeal of your completed patchwork design.
The first thing to do before starting to complete your edges is to take your fabric out of the hoop and cut it to your desired length, leaving an allowance of approximately two or three millimetres on either side of the design. Once you have done this, you need to add an extended border around the edge of the patch.
This can be done easily by whipping it along the whole piece of fabric in a tight whipstitching manner. You could alternatively do this using the sewing machine in a zigzag stitch pattern. Sometimes people also add some drops of fabric glue or fray stop to the edges.
Creating the Heat-Activated Backing
Of course, most people are not fond of applying their patch each time they wear it using needle and thread. This is why there exists heat-sensitive glue, if you have been trying to figure out the best way of ironing on patches.
Here is the trick: use paper-backed fusible web that is available in brands such as Heat’n Bond. When you have completed your patch and it is all ready, place it face-down on your ironing board.
Then take another piece of the fusible web and cut it in the same dimensions as the patch. Put the rough side facing the back of your patch, while the other side is up. Iron it using a dry, hot iron within the recommended time period found on the packaging. It normally takes a few seconds.
Cool it to room temperature. It is now time to apply your creation to your favourite jacket. Just remove the backing cover and turn your patch upside down so that it sticks out. Press your patch firmly with a dry hot iron using either a cloth or baking paper as a barrier.
When to Seek Professional Craftsmanship
DIY crafts might easily serve as a good method to create unique craft items or at least give you something to engage yourself with during the weekends, but there are cases when you might find the need for something bigger and more elaborate than you have initially planned.
In some instances, for example, if you intend to create a new collection of clothes for a fashion brand or if you have to create some uniforms for a sports club, it might no longer be possible to create all these patches through handcrafting. In this case, custom embroidered patches ordered from an Australian maker can definitely help you out.
Companies that offer custom patches use modern technologies to reproduce your idea several times through computer-controlled stitching, laser cutting, and durable materials that stand up to many washes without losing their look.
If you want to create custom logos and personalised embroidered patches through embroidery, then you would need to find a local company that will offer you the best embroidery services. And consequently, there will be no danger of getting your fingers hurt from machine needles.
Exploring Different Patch Styles
Beyond the stitching process, there are other considerations that you need to take into account when designing your bespoke embroidery patches. You can also incorporate additional elements into the designing of your embroidered patches so as to introduce some sparkle to your embroidery project. By this, you need to also think of incorporating additional materials to your embroidered patches.
For instance, if you want to make your embroidered patches fuzzy, you can experiment with different kinds of chenille patches and upholstery fabrics. Alternatively, if you want to make strong patches, you can design leather patches and create that “bad boy” impression that is typical of biker clubs’ embroidered patches.
One of the most interesting things regarding how to make embroidered patches is that you will have to utilise all these processes to create various kinds of embroidered patches of different sizes. For instance, you can decide to manufacture big-sized embroidered patches for your jackets and small ones for your polo shirts.
Frequently Asked Questions
Can I wash my clothes normally after applying an iron-on patch?
Washing is possible, but be gentle with clothes in order not to destroy the adhesive. The clothes should be worn inside out while being washed at low temperatures with a mild programme. No fabric softener and bleach should be used since such products might soften the glue. To prevent the lifting of edges, the drying should be done on a line, not a tumble dryer.
What is the easiest fabric to use when making my very first patch?
Ordinary craft felt is recommended for beginners, as it does not fray, as it consists of non-woven cloth. This type is thicker and thus gives a more durable feel right away. Further development would involve working with woven materials like medium cotton twill and denim, which are visually appealing materials that require caution while working with edges.
Is it actually cheaper to craft these at home rather than buying them?
It totally depends on how much time one considers it necessary to invest. Indeed, it is cheaper to buy the end product as compared to purchasing the necessary materials if one needs just one or two patches. However, if there is a basic kit of materials, then the cost per item drops dramatically. At the same time, if twenty items of the same kind are needed, then the time spent will be sufficient.
How do I stop the thread from tangling while I am stitching by hand?
Thread tangling is a problem that most people experience when they are still not proficient at sewing. In place of choosing thread that is too long, thread that is as long as from the fingertip to the elbow should be chosen. Thread used for embroidery (six strands) should be undone without twisting it. The best way to undo such a thread would be to leave it hanging loose, but if this fails, it should be done using beeswax.
Start Your Custom Patch Journey Today
It is awesome when you create your own wearable art, but there are instances when it requires flawless work that is done by professionals right at your doorstep. No matter if you have created a complicated logo for your business, you require some merchandise for your band, or you just want to see your digital design in real life.
We have got you covered. At Custom Patches Australia, our speciality lies in how to make embroidered patches of top-notch quality that can be used on any type of clothing and look absolutely fantastic.
Do not hide yourself among thousands of people who do not have enough courage to showcase their individuality. Get in touch with our expert team at Custom Patches Australia today for a free quote on your outstanding designs!