
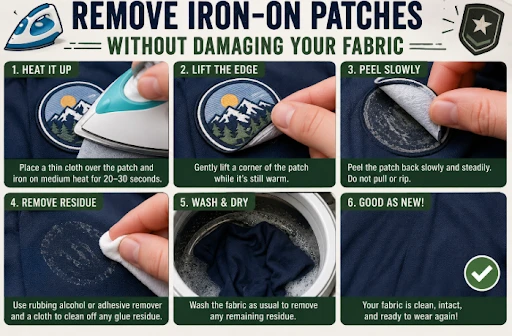
Need to remove an iron-on patch without damaging the garment underneath? Most people who use patches run into this at some point, whether the jacket’s been outgrown, the design needs updating, or the patch simply went on in the wrong spot.
With the right heat, tools and a bit of patience, you can usually remove a patch without leaving marks, glue residue or a hole in the fabric. The right method depends on the fabric, so denim and cotton can be treated differently from nylon, waterproof materials or leather.
This guide walks through the iron method, heat gun removal, dealing with adhesive residue, and handling special fabrics like denim, nylon and leather.
Why Removing an Iron-On Patch the Correct Way Matters
The iron-on patch contains an adhesive on its backing that’s designed to bond firmly to fabric. This adhesive melts under heat and creates a strong bond between the patch and the weave of the fabric.
That bond is what makes iron-on patches so practical: when properly applied, they can hold up through repeated washing, which is why iron-on embroidered patches on uniforms stay put through many wash cycles.
Patch attachment is a combination of heat, pressure and time, so removing a patch means undoing that process carefully, without damaging the fabric underneath.
If you haven’t already, it’s worth reading our detailed tutorial on how to iron on a patch first. Understanding how the patch was applied makes the removal process a lot more intuitive.
Most of the fabric damage that happens during removal comes down to rushing, too much pressure, or the wrong temperature. Taking it slow protects the garment and lets you get the benefit of the patch without the downside.
The Heat and Iron Method for Patch Removal
For cotton, denim and canvas, a household iron is usually the simplest removal method, and it closely mirrors how the patch was applied in the first place.
- Turn the garment inside out, or position it with the patch facing down if the fabric can’t be flipped.
- Place a thin cotton cloth or pressing sheet over the patch to protect the fabric from direct heat.
- Set the iron to the lowest temperature likely to soften the adhesive, based on the garment’s care label, with the steam function turned off. Increase gradually only if needed.
- Apply the iron to the protective layer for about fifteen to twenty seconds, then move it and repeat.
- Once the adhesive softens, gently lift a corner of the patch with a dull object, like an old card or the handle of a seam ripper, and peel it off.
- Repeat as needed until the patch comes free.
This is essentially the reverse of ironing a patch on. If application went smoothly, removal usually will too.
Worth setting expectations early: no removal method can guarantee the fabric looks exactly as it did before the patch went on. Older patches in particular may leave a faint outline, slight colour difference, or a trace of adhesive shadow, even when removal is done carefully.
Heat Gun Patch Removal
For thicker patches, multi-layered embroidery, or fabrics that don’t respond well to a flat iron, a heat gun gives more control over a concentrated heat source.
- Use the lowest heat setting that softens the adhesive. Higher settings can scorch fabric within seconds.
- Keep the heat source moving continuously, don’t hold it still over one spot.
- Start further away than you think you need to, and only move closer if the adhesive isn’t softening.
- Work in short bursts, checking the edges with a dull tool in between.
- Once the glue starts to soften, begin lifting the patch slowly from a corner, reheating as needed.
- Let the fabric cool before checking for leftover glue or marks.
Always test on an inconspicuous area first, heat guns vary in temperature and airflow, so there’s no single distance or timing that’s safe for every fabric and every unit. A heat gun tends to give more precision than an iron, which makes it useful around zippers, buttons or trims you want to keep away from direct heat. It isn’t the right tool for every fabric though, see the leather and nylon notes below.

Removing Iron-On Patch Residue
Some adhesive residue can remain even after a careful removal. Clearing it doesn’t usually require harsh chemicals. Start with the gentlest option and work up only if needed:
- Warm water and a little dish soap, worked in with an old toothbrush, handles light residue on most fabrics.
- A fabric-safe adhesive remover can help with stronger residue. Choose a product specifically labelled as suitable for the garment’s fabric, apply sparingly, and let it sit for a minute before wiping off.
- Rubbing alcohol on a cotton cloth can also break down glue, but it’s more likely to affect dye or finish on delicate fabrics, so treat it as a fallback rather than a first step.
Always test any product on a hidden area first, some fabrics don’t handle solvents well. Once the residue is gone, wash the garment according to its care label. Any remaining trace can usually be treated again with a fabric-safe adhesive remover before that wash.
Fabric-Specific Precautions
Not all fabrics respond to heat and solvents the same way, so it’s worth adjusting your approach to what you’re working with.
Denim
Denim is generally forgiving and can take higher temperatures, but repeated heat in one spot can fade the fabric or leave it stiffer in that area. Keep the iron or heat gun moving rather than lingering.
Nylon
Use extra caution with nylon and other synthetics. They can warp, develop shiny marks or melt at temperatures well below what’s needed to remove adhesive from natural fabrics. Our guide to using iron-on patches on nylon covers this in more detail, and the same caution applies in reverse during removal. Avoid direct heat where possible, test a hidden area first, and if the garment is labelled heat-sensitive or has a waterproof or coated finish, follow the care label rather than attempting heat-based removal at home.
Leather
Never use a hot iron directly on leather or faux leather, the heat can cause cracking, bubbling, shrinkage or discolouration. A heat gun isn’t a safe substitute here either. If an iron-on patch needs to come off a leather item, check the manufacturer’s care instructions or have it professionally removed. If you’re clearing adhesive from a leather surface, use a solvent specifically labelled safe for that leather type, not alcohol or citrus-based removers, and test on a hidden area first.
Common Mistakes That Damage Fabric
Most fabric damage during patch removal comes down to a handful of avoidable mistakes:
- Using high heat on synthetic fabrics, which causes melting, shine marks or warping.
- Pulling the patch off cold, before the adhesive has softened, which can tear the fabric weave.
- Skipping the protective cloth when ironing, risking scorch marks on the garment.
- Holding a heat gun too close, which concentrates heat in one spot and can singe fibres in seconds.
- Using strong solvents on delicate or dyed fabric without testing first, which can cause fading or discolouration.
- Rushing the peel instead of working slowly around the edges, which often pushes adhesive deeper into the fabric.
Avoiding these is the difference between a clean removal and a garment that needs professional repair.
Preparing the Fabric for a New Patch
Once the old patch and any residue are gone, clean the garment according to its care label and let it dry completely. Check the fabric for heat damage, discolouration or weakened fibres before applying anything new, and iron it smooth so wrinkles don’t affect adhesion.
For the actual application steps, heat, pressure and timing, see our guide to iron-on patches, which covers settings suited to Australian conditions and common local fabrics.
If the old patch is too worn, faded or damaged to reuse, Custom Patches Australia can create embroidered, woven or other custom patches in the shape, size and backing you need.
Frequently Asked Questions
Will removing an iron-on patch leave a mark on my fabric?
Careful heat treatment and slow peeling reduces the risk of visible marks or shininess, and a protective cloth helps too. That said, no method can promise a completely invisible result, especially on older patches. Any leftover residue can usually be treated with a fabric-safe remover before washing.
What’s the best way to remove old patches that have been on for years?
Re-soften the adhesive in short, controlled bursts and peel gradually rather than turning up the heat to speed things along. Excess heat can still burn or melt fabric, even on an old, well-set patch. Older adhesive may need a few heating cycles, so patience matters more than temperature.
Can I use a hairdryer instead of an iron or heat gun?
A hairdryer can soften adhesive on some lightweight fabrics, but it’s less controlled and predictable than an iron. If you use one, keep the airflow moving and stop if the fabric starts to feel hot, look shiny, or lose its shape.
How do I remove iron-on patches from a garment that can’t be ironed?
If the fabric is heat-tolerant, a heat gun may be an option when used carefully on its lowest effective setting. Check the care label first and test an inconspicuous area. For heat-sensitive, coated, waterproof or technical fabrics, avoid heat-based removal and consider having the patch professionally removed instead.
Can I reuse an iron-on patch after removing it?
Sometimes, but it depends on the condition of the patch and its adhesive backing. Removing a patch can disturb or weaken the adhesive, so a removed iron-on patch may not bond as reliably when reapplied. If the patch is important or needs to be reused, sew-on or another suitable backing may be a better option.
Ready for a Replacement Patch?
Removing an iron-on patch doesn’t have to mean risking your jacket or dealing with a sticky mess. With the right temperature, tools and a bit of patience, the process is very manageable.
Whether you’re using an iron, a heat gun, or working through residue on denim, nylon or leather, going slow and steady is what protects the garment.
Once the old patch is off and the fabric’s ready, replacing it can be a simple way to refresh a jacket, uniform or team garment. Custom Patches Australia can create replacement embroidered, woven and other custom patches to suit your design and backing.
Contact us for a free quote.